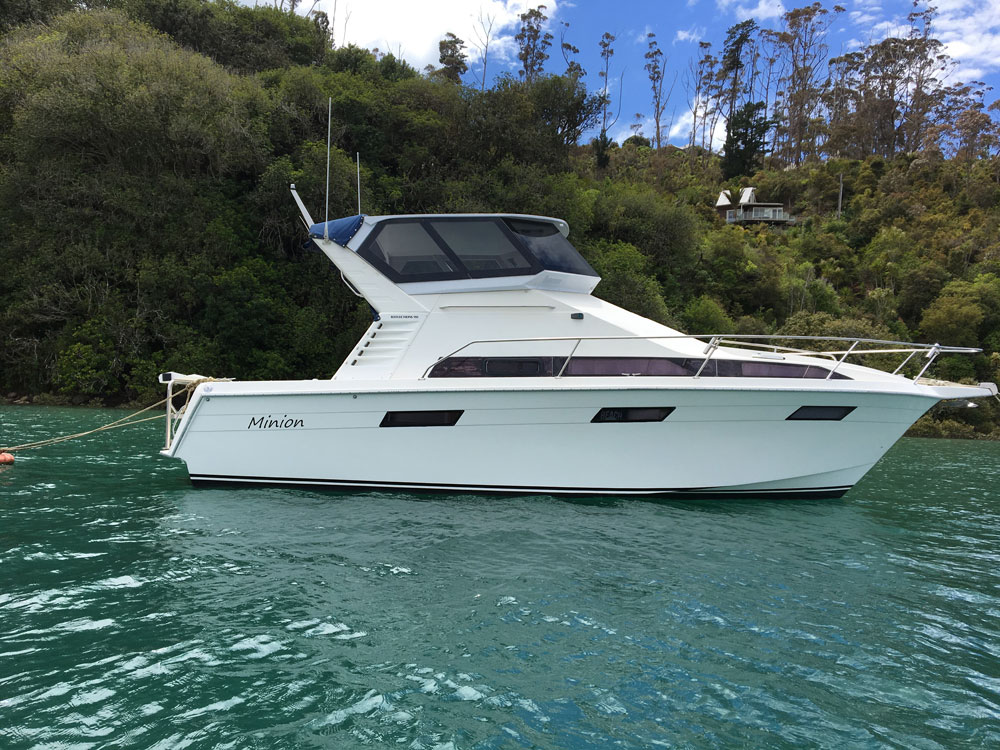
Mark Burt recounted how he added a hardtop to his open flybridge Reflections 980 and transformed the boat into one that is now more user-friendly year round.
After transitioning from a Hard Top Trailer boat and all its attributes, I upgraded to a 1988, 9.8m Reflections 980 designed by Alan Young and built by McDell Marine. I had researched (dreamed) for many years, about owning a launch and after looking at brands such as Vindex and Markline, I kept coming back to the Reflections. They are probably the roomiest 10m ever made. They are an awesome sea boat, easily pushed, beamy and stable. I was lucky enough to come across one of these Reflections 980’s which ticked “all” my boxes except for one thing! The canopy/soft top arrangement or what-ever one would call it. I called it many things according to my boat buddies who are convinced I have Terrets, lol.
Apart from the fact that the canopy leaked, was faded, was far too low on the flybridge to walk under and it needed replacing, I HATED IT, period! It was hideous! I decided there and then that this was the boat for me but, as for the lid? It had to go!

After purchasing the boat I spent a couple of months titivating various bits and pieces getting it how I wanted it, but with this crappy soft top staring at me and the increasing hatred of it niggling in the back of my mind I decided, enough was enough! I took some “beam on” photographs and set about blocking out the old canopy and merely sketching my ideas on the photos.
Now I think we’ve all seen some pretty hideous attempts of hard top additions and very few of them look acceptable in my mind. Some may be functional, but the majority are nothing short of ugly. This was never an option for me. I was hell-bent on making this work. After I put down a few designs, I decided on one in particular. I have to say I consulted no one about it. I just took the bull by the horns and decided to do it.
Had to be Done
While I’m a handy type of person I have had no experience in making anything such as this or ever had the balls even to attempt it, but this is one of those things that “had to be done”.
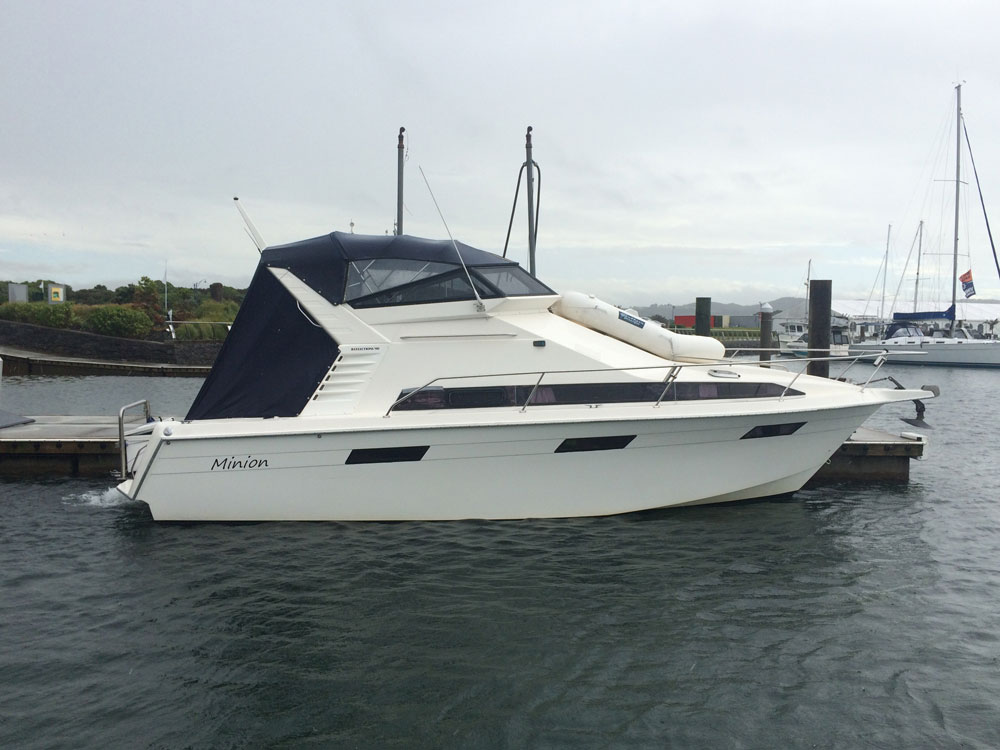
The first time I had the boat out of the water for servicing and anti-fouling was my chance! Off came the old canopy. How it immediately improved the look of the boat!
The best thing about the challenge I had set before myself was the fact that the fly-bridge had a removable reverse shear wind deflection fibreglass piece around three sides. Without being able to remove this, the task would have been so much harder. This was screwed and onto the boat cabin top. So I removed it, borrowed a trailer and took it to its new home in my garage for the two months it took to build the new hardtop.
The top edge of this piece had a channel around the top of it about 20mm wide and 70mm deep which had been created for the insert of a piece of ply to fix the aluminium windows too. This had rotted out anyway so was a good find. After cleaning out this track, I was ready to start construction of the new topsides. I bought four sheets of 18mm Meranti marine ply and four sheets of 6mm from Plytech, plus a heap of stainless steel screws and some glues and resin etc. Let the show begin.
I did most of the design by eye using a tape measure for the accuracy of course. I cut out the ply to the shapes I wanted and commenced glueing and screwing it together. I was surprised how quickly it seemed to come together. I didn’t let anyone in on my project as I didn’t want a whole lot of ideas thrown at me. I had a picture in my head and that’s what I was going to have. Except for one close friend, Phil, who I had mentioned my proposal to, arrived unannounced with a heap of power tools and a willingness to help. Thanks to Phil it made the job a lot easier.
Taking Shape
After I had the sides up to the shape I wanted and fitted to the base and windows cut out, it was time to tackle the roof. I knew what I wanted, but getting it was going to be a challenge. You see I didn’t just want a flat roof. Oh no no no! I wanted a far more complicated “multi-faceted” roofline to compliment the lines of the boat. This was a challenge I was not prepared for. With props of wood and sheets of easily bendable ply, I created the underside roof lining on top of the side frames. Understand that I did not want any flat surfaces so that it looked like a packing crate on top of the boat. They all had to have shape and form if I was to make it look any good at all. There are no flat panels on this project.
So after much tweaking of the wooden props and bending of ply, I got the underside ceiling to the shape I wanted and more of an idea of what the finished article would look like. The temporary nailing, tacking, screwing and glueing was endless. Thank goodness for battery drivers.
Next was the ceiling joists, battens, beams etc., whatever you call them. Getting the right shape, strength and look right factor was a mission in itself and undoubtedly the most challenging part of the whole exercise. They ranged from about 25mm thick to 80mm thick in various graduating shapes. There were a few mistakes made, I have to admit, but luckily there’s always more ply.
After this part was completed, once I got the shape I wanted, I resin coated the whole thing, framing, ply, the lot. It was now time to think about what I would need inside the roof in the way of wiring for lights, wipers, solar panels mounting blocks for spotlights etc. etc. etc., and anything else one might require up there. So, after the required wiring was installed, I came to THE most important thing I needed in the roof cavity, insulation! I didn’t want the hot sun turning the hard top into a sauna on a hot day. I simply used spray type insulation as a quick and easy way of getting insulation into the roof cavity. This works a treat. After it had set, I simply shaved the excess off down to the correct level with a saw. Brilliant!
Ready for the Roof
Now it was ready for the rooftop to be fitted. Out of convenience, I used the exact size of the ply sheet for the centre/top panel of the roof. Shaped of course. This worked out well as I was working with a square and true shape, this helped a novice like me immensely. Much eyeing and measuring ensued to get it right. Next was the shape and forming of three-ply strips laminated and shaped around the edge of the upper and lower roof surfaces. This WAS time-consuming but was eventually finished.
Then I trimmed out for the Vetus Glass Hatch in the roof so I could stick my head out and yell at my crew on the bow if needed. I also cut out for a couple of hinged vents on the reverse shear which has proved invaluable while moored and an even better asset while underway, giving fresh air right through the flybridge. Next came removing all the screws and then filling and sanding of the hundreds of screw holes. I then coated the whole thing in resin. I didn’t use fibreglass mesh or mat in it, as I just wanted to protect the timber without adding too much weight to the whole thing. Once I had done this, I could see all the imperfections in my work so out came the fillers and away I went again, filling and sanding, filling and sanding, filling and sanding, laborious as hell, but had to be done.
Once that was finished it was time to throw some paint at it. I found the smaller type foam rollers were cheap and throwaway and did a great job. I didn’t wash out one of them. Same with paint brushes. I masked out borders and enhancement lines to improve the finished article. I used Kiwi-Grip, non-slip textured paint systems used with a special roller on the rooftop to avoid slips and falls should I have to go up there. This gives a great finish and covers up a multitude of sins regarding workmanship. Worked a treat.
So, once the construction and painting were finished, I had intended getting the 6mm toughened glass window panes installed then lifting the whole thing onto the boat in one piece completed. My glass supplier had other ideas (and issues) and wanted exact templates of every piece of glass to go in it. Consequentially, the boat went back in the drink with what ended up being four more weeks wait instead of the ten days as promised. So I waited, which was very annoying and frustrating with a lovely yellow tarpaulin over the boat to keep the winter weather out. Well, it ended up being six weeks to get the glass installed. Good things come to those who wait they say!
Awesome
Once the tarpaulin was removed and the glass fitted I could finally stand back and see what I had created. I liked it! But what would others think/say? “Awesome”, “looks good” most would say. Phew, I thought. Can’t have cocked it up too badly then. Then one day a guy came up to me out of the blue and said, “ that’s probably one of the best “add-on” hard tops I have ever seen added to a boat”. Wow! “Thanks very much” I replied, we chatted about it for a while then I casually asked him what he did for a living? “I’m a boat builder” he replied! Holy S*#t. Now that’s a compliment if ever I’ve heard one, felt quite proud really. Nothing like a compliment to boost one’s ego. Especially about one’s boat!! Yeeeaa!
So I have done over 100 hours since the new top was added and I’d have to say, what a transformation. This has added another room to the boat and made it a great place to enjoy a day trolling and an afternoon drink in the sunset. I’m sure this would have been a much harder job without the ability to remove the reverse shear and take it home to work on. Having to make untold trips down to the boat and measure and fit all the components would have been very time consuming and much more expensive to achieve.
After much experience with the Reflections 980, I would have no hesitation if they were available, in buying a new model of the same boat! It’s nothing short of AWESOME.
PULL QUOTE
I did not want any flat surfaces so that it looked like a packing crate on top of the boat.